Polishing
a Telescope Mirror
Baldwin
The mirror
has been ground through 3 micron aluminum oxide grit, it is spherical,
there are no scratches, no non-uniform spots, the lap has been made, and you
are ready to polish. Now the real work beings.
Your goal
right now is not to make the mirror precise, but to make it shiny. You will
want to do things that won’t make it wrong, but exact is not the issue right
now. Shiny is the issue.
Barrel
Method
The plan
will work like this: Polish for a few hours, then check it for astigmatism, and
then either continue polishing until shiny or go back and either polish out the
astigmatism or grind out the astigmatism, then return to polishing.
There are
a few methods for polishing. You can be Mirror on Top (MOT), or you can be Tool
on Top (TOT). If the project is 12 inches or smaller and the tool is full
sized, then I recommend a half hour TOT, then a half hour of MOT, and back and
forth. If the mirror is larger than 12 inches, then I would remain TOT for the
duration. Strokes may tend to work the center more than the edge, and working
it one way without the other may change your mirror from being spherical.
However, if it is large, then MOT can be difficult, especially if you are using
a tool that is smaller than the mirror.
OK,
let’s start. Everything is cleaned. Little pieces of anything, dust,
dander, bug, past grits, even 5 micron, all of this can scratch you project, so
everything, including you, must be clean.
Put the
mirror on the barrel and block it like before. You have already made a lap and
it has been pressed to fit the mirror. If you warm press the lap onto the
mirror, makes sure the mirror and lap are cooled before working. Have a brass
brush handy. Before polishing, scuff the face of the lap with the brass brush
so that it has the sheen removed. This gives you jillions of little scratches
that the CeO will fill and stick to the lap Then WASH the lap so that any
bristles of the brass is gone and the lap is clean.
Spray some
water onto the mirror, which is on the barrel face-up, then wipe the water off
so that it is just wet. This removes the dust that accumulated over that last
few minutes. Sprinkle a mixture of cerium oxide and water onto the mirror, and
place the lap straight down onto it. Move it around a bit to smear the cerium, and
press them together. Begin your W strokes. IF it doesn’t have the feel
that it is doing work and just sliding, it needs more pressing. This time our W
strokes will only overhang the mirror with a small amount, no more than 20% of
the diameter of the lap and no less than 15% the diameter of the lap. That
leaves roughly 17% or so. Too much overhang and you will get a rolled outer
zone, a mild version of TDE,too little and you won’t polish all the way
to the edge and will possibly even end up with a turned UP edge. Rub these W
strokes until the lap no longer feels like it is working but is mostly sliding.
At this point you will need to scuff the lap- again, and repeat the process.
You will also have to recharge with cerium as you go. Rotate the tool and
mirror frequently as before. Start working lightly and slowly with W strokes.
You will eventually increase your pressure, but for now keep it light and slow.
After a while you will feel the lap mating better and you can increase your
pressure, but caution: too much pressure will deform the spherical shape. If
you start with too much pressure and the lap isn’t perfectly mating, then
the pitch will break and little pieces of it will sleek your glass. As you work
it will dry out a bit, so have a water bottle ready to spray a mist of water on
your work. Occasionally you will have to add a little cerium oxide and water
solution. I use a saline bottle with cerium oxide and water in it. Shake it
before applying, since cerium oxide settles. Keep your strokes fairly short
with less overhang to prevent turning the edge over. That’s a hard one to
repair, it’s best to keep it under control as you go. You can interchange
who is on top and who is on bottom if your project is 12” or less and you
have a full sized lap. Otherwise, keep the lap on the top. Don’t
interchange to frequently, just polish.
After
about an hour of polishing you will see that the glass is shiny. It isn’t
even close to being done yet, but it is shiny enough to reflect light, and
this is our opportunity to check for astigmatism. If there is astigmatism, then
you have to go back a step and repeat grinding from about 500 or 220. For this
reason we try to check for astigmatism early in polishing so we don’t do
a whole lot of work for nothing. There are ways to polish out an astigmatism,
but I’ll hold off on that for now. At this point, check out the astigmatism page. If it turns
out that you don’t have astigmatism, come back here and continue
polishing. If you do have to go back to grinding, and the tool you used to
grind is the tool that your lap is on, then you will have to remove and store
the pitch form the tool. For this reason it is nice to have a tool you ground
with and a separate tool for pitch. You can remove pitch from the tool by
freezing it and chiseling it off. A second tool for the lap is nice.
If your
mirror is not astigmatic, then continue polishing for hours. Depending on how
large your project is, how strong you are, the temperature, type of cerium, and
lots of other variables, the length of time it takes to polish out the mirror
will vary.
To tell if
the mirror is polished completely, you will perform the laser test. A hand held
laser [red, not green please] is shot onto the cleaned and dried mirror
surface. If the mirror is polished, the laser will reflect off the glass and
not scatter, and you will not be able to see the red dot on the top surface of
the glass. If, however, the mirror is not completely polished, but still a bit
pitted, the glass will scatter laser light and you will be able to see the red
dot on the top surface of the glass. Even if the mirror looks polished, any
scattering implies that it isn’t. When you aluminize the mirror, this will
be easily seen and will upset you.
Don’t
be alarmed if this polishing crap takes forever. It’s part of the
process. If you have a large mirror, polishing will tire you out. Our
suggestion is to schedule a polishing party with other ATMers, buy them pizza
and Pepsi, and take turns polishing for a day. You will each take breaks, but
the mirror will be worked continuously. Then when one of the other ATMers has a
big mirror to be polished, make sure you help with them at their polishing
party. Also, see the section on mirror making machines. This is the real ticket
if you plan on making many mirrors.
It will
take a few sessions to polish your mirror, so in between you have to take good
care of your lap. Storing it face up in a dust free closet with nothing on it
is the way to go. If you have something on it, like a cloth or an object, even
a light object, then over time it will defect the pitch. Pitch is amorphous, it
will be able to be forced to move if done very slowly, like an object on it for
a period of time. If you move pitch fast, it breaks. If you move it slow, it
deforms. If you store it in a hot place, it will also tend to bleed over. When
you start working again it will have to be pressed into shape again.
It takes
hours to polish a mirror. While you work the mirror the pitch flows a bit. When
it flows the facets close up and the block close in, that is the gaps get
thinner. You will have to dress your lap once in a while. You will occasionally
have to press it, occasionally have to press it with screen, and occasionally
recut the blocks with a razor. Any time you do that you will have to repress
it. You’ll get to know what it feels like when it is working well, and
you’ll be able to tell when it is time to perform these repairs.
When the
mirror is polished, then it is ready to figure into a paraboloid. If you got to
this point, you have accomplished an amazing feat, and you need to be very
proud of your accomplishment. Just a “little” more work and
you’ll be there. I quoted the word little because you are only going to
alter the mirror by a little bit. A slow mirror will be a little work, but a
fast mirror, especially if it is large, will be a lot of work. You investment
so far is huge, so don’t wuss out now.
Here is a
picture of Jeff polishing a 24” f/3.6 with a sub-diameter
16” pitch lap.
h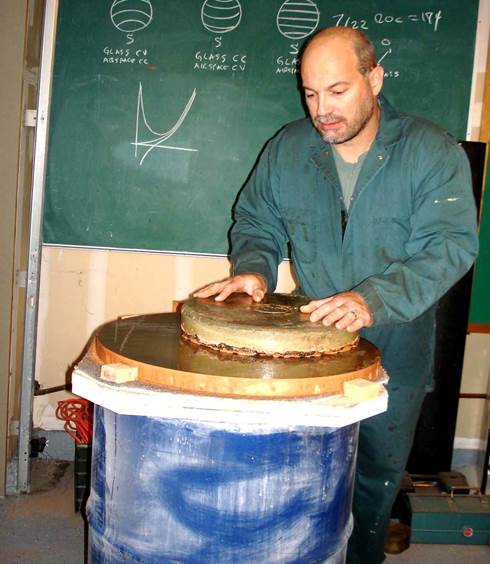
Click here
to go to the astigmatism
link or to go to the figuring
stage.
Machine
Method
I no
longer work mirrors on barrels, I don’t have that much life left and I’m
not going to waist it on walking around a barrel. I use a machine now. So here
is the ticket for machine polishing.
Just like
with grinding the sphere on a machine, you will put the mirror on the turntable
fact up, put your cerium mixture on it, and place the lap onto it. The lap will
again be 75% the diameter of the mirror and will have a 1/6 lap overhang. For
example, if you have a 24” mirror, you will have an 18” polishing
tool that has a 3” overhang. 3” is 1/6 of the 18” and it is
1/8 of the 24”. Let the turntable rotate the mirror and the tool will
autorotate. This method is called “fixed post polishing”. This will
work until the mirror is polished. Once polished things like zones and
roughness can be corrected, but you can prevent zones a bit by letting the arm
holding the lap in place wobble, allowing it to move ¼” in and out
as the turntable rotates. On machine mirror making, the lap should have an
intersection or a facet at the center of the lap. If the mirror is pressed and
fitting correctly, and you set the lap so it is off to the side of the mirror
but entirely not overhanging anywhere, then when you turn on the turntable the
tool ought to rotate at the exact same RPM as the mirror. That’s your
check that all is ok. Then you can put it where it is supposed to be and fire
it up.
You now
are not doing that awful work, the machine is. You will have to monitor it,
making sure cerium doesn’t dry out, nothing bad happens, etc. If your
machine isn’t well made, then the turntable may offer a small wobble that
will induce astigmatism. If this is the case, rotate the mirror into a new rotation
position on the turn table once in a while to keep it from having the same
thing happen over and over and over in the same place.
With this
1/6 lap overhang, you are at a 16.6667% overhang, very close to 17%. This is
perfect and shouldn’t give you a TDE or a TUE. However, if you DO get
TDE, reset it so that you have a smaller overhang. Adjust small, a little bit
goes a long way. If you are seeing that you are getting TUP, then put it
further out a bit. I’d never go below 15% and I’d never go over
20%.
Letting
your machine polish for 5 to 20 hours is a lot more fun than doing that work
yourself.